


This guide takes you through the whole Trainer App once: from signing up, through squad, matches and tactics, to training planning and load management. Take half an hour – afterwards you’ll know everything important.
Our example is FC Falkental 1921 with coach Thomas. The club doesn’t really exist and all names are made up. The pictures, however, come from the real app, so this is what it looks like for you too.
1Sign up and sign in
The Trainer App runs entirely in the browser. You don’t need to install anything, whether on a PC, tablet or phone. Simply open app.fussball-trainer-app.de.
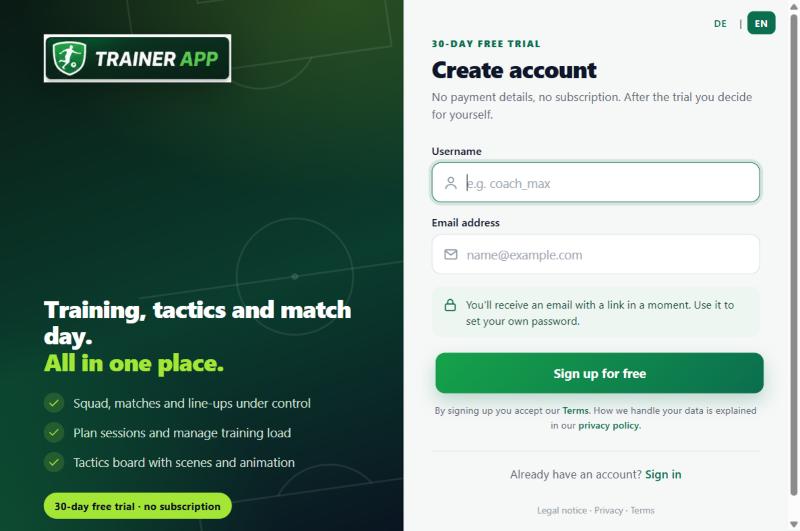
Create an account
On the sign-in page, click “Try it free for 30 days”. You only need two things:
- Username: you’ll use it to sign in later, e.g. coach_thomas.
- Email address: we’ll send you a link there.
After clicking Sign up for free you’ll receive an email. Use the link in it to set your own password. Check your spam folder too if the email hasn’t arrived after a few minutes.
Sign in
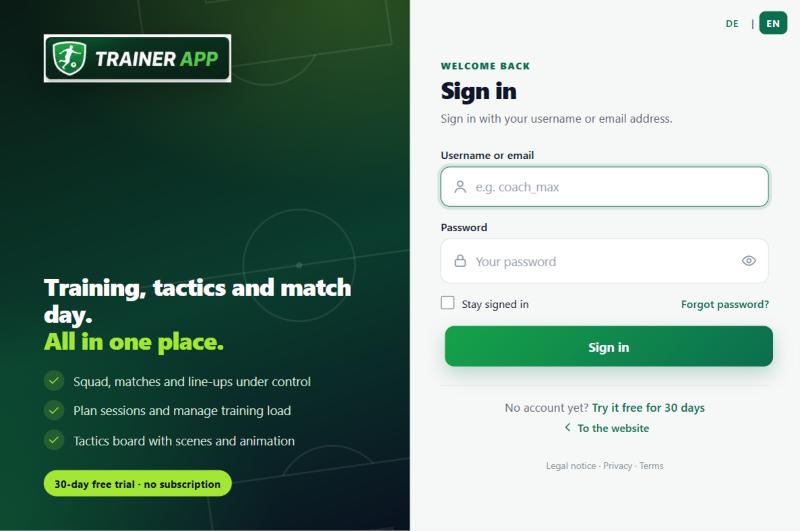
Sign in with your username (or your email address) and your password. Tick “Stay signed in” if you’re working on your own device. Then you won’t have to sign in every time.
2First start: set up your club
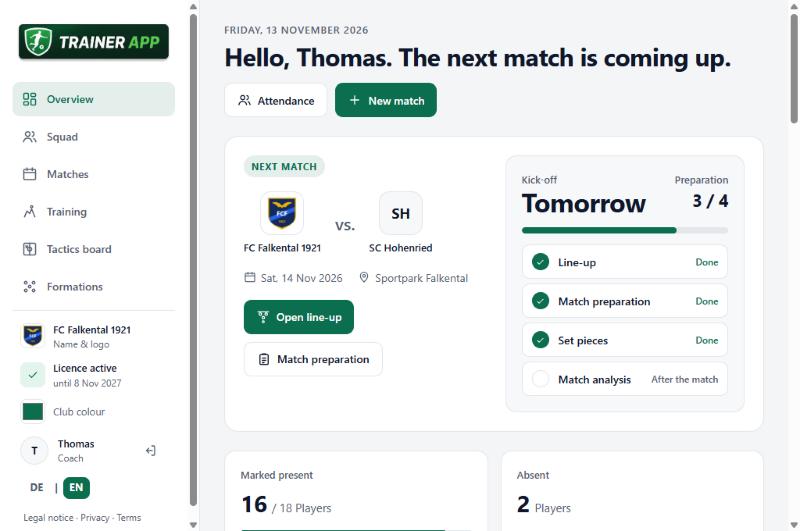
After signing in for the first time, you’ll land on the Overview. At first it is still empty – that will change in a moment. On the left you’ll see the navigation that takes you to all areas: Overview, Squad, Matches, Training, Tactics board and Formations.
The first thing to do is enter your club. To do this, click at the bottom left on “Set up club”. A small window opens:
- Enter your club name – including the team if you like, e.g. “FC Falkental 1921” or “SV Musterdorf U15”.
- Click “Choose logo …” and pick your badge from your device. JPG, PNG and WebP up to 2 MB are allowed. A square image looks best.
- With Save you’re done.
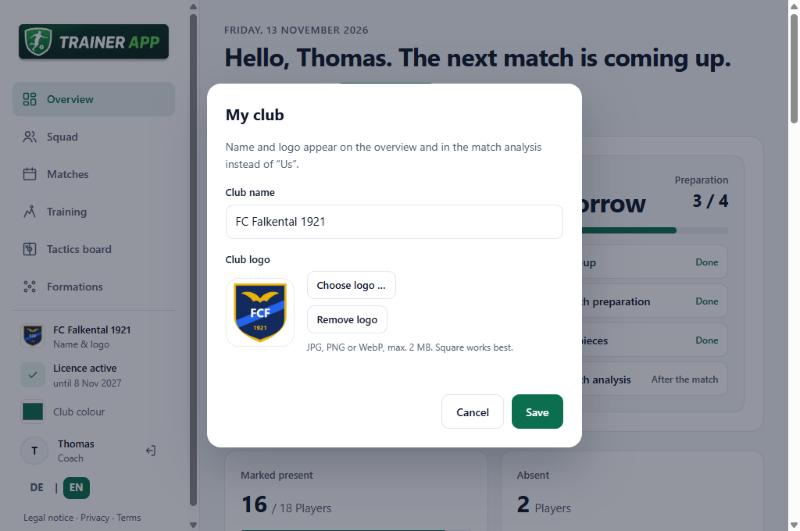
Right below, you can change the Club colour – just tap the coloured box and choose your colour. Buttons, highlights and charts throughout the app adapt to it.
↑ back to top3Create your squad
Not much works without players. Under Squad you create your team. Click + Add player and enter name, shirt number and position.
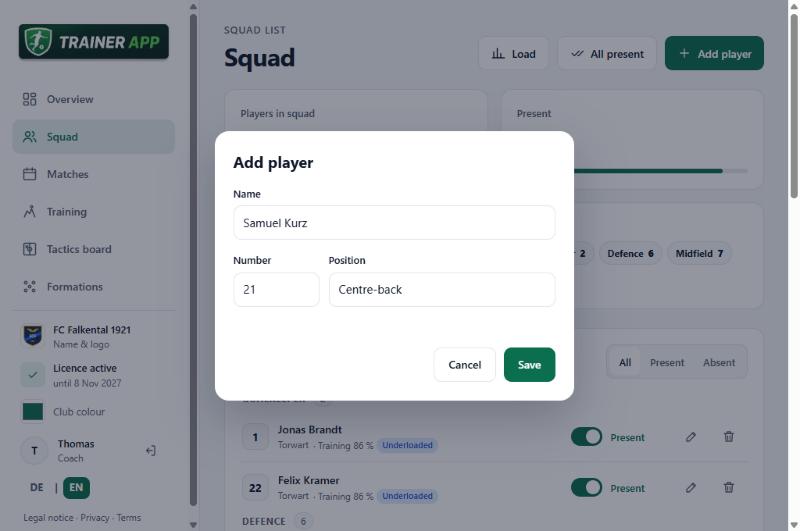
As you type the position, the app suggests matching terms (goalkeeper, centre-back, defensive midfielder …). It uses them to sort players automatically into goalkeepers, defence, midfield and attack.
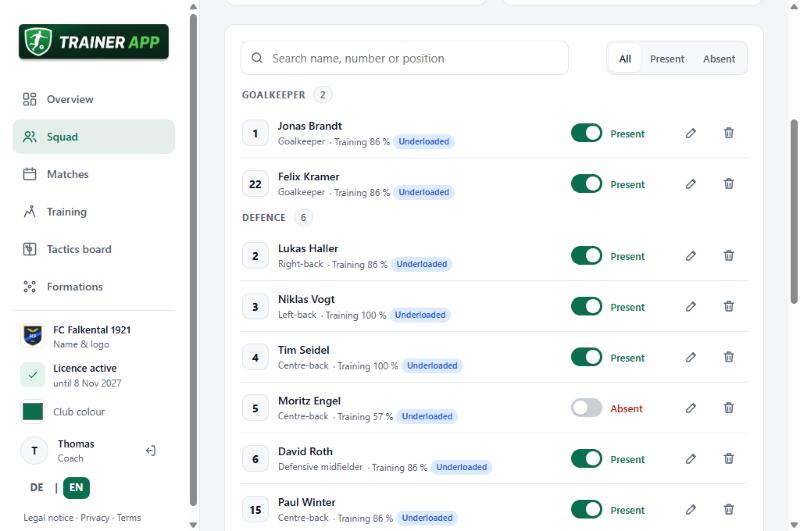
Who’s available?
With the switch to the right of each player, you mark them as present or absent, for example when someone is ill or on holiday. This matters, because for the line-up and on the tactics board the app only offers you the players who are present. At the top right, “All present” switches everyone back to green with one click.
After a few weeks, you’ll also see under the player’s name how often they attended training (e.g. “Training 88 %”) and whether their load stands out. More on this in chapter 15.
Use the search at the top to find players by name, number or position. The “All / Present / Absent” buttons filter the list – handy before match day.
4Add matches
Under Matches you’ll find your fixture list. With + New match you enter the opponent, date and venue. That’s all.
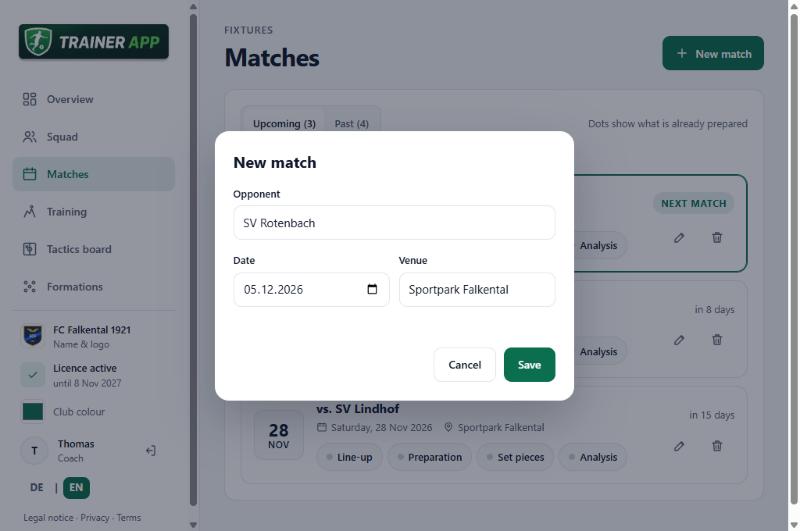
The list shows upcoming and past matches separately. Below each match are four dots: line-up, preparation, set pieces and analysis. A green dot means “already created”. So you can see at a glance what’s still missing before the next match. Clicking a dot opens the matching area directly.
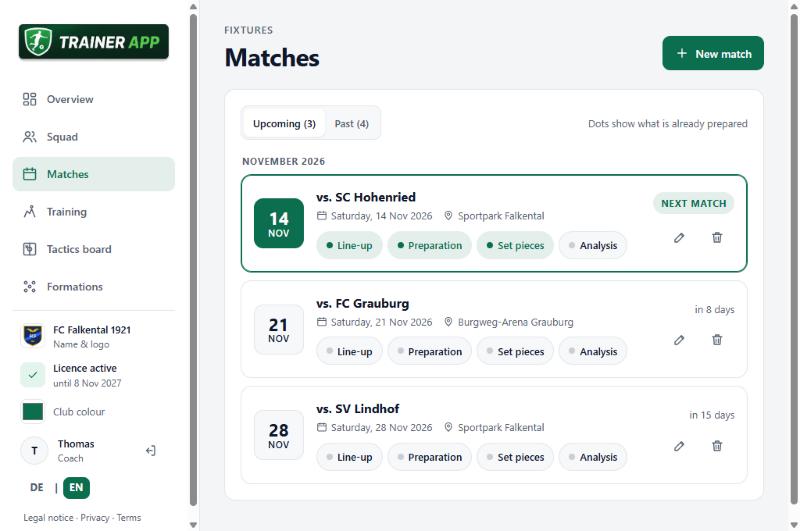
Use the pencil to edit a match (e.g. if it’s rescheduled) and the bin to delete it. Deleting also removes the line-up, preparation, set pieces and analysis of that match.
↑ back to top5Line-up
Open a match and go to the Line-up tab. On the left are all players who are present, on the right the pitch.
- Drag a player onto the pitch and they’re in the starting XI. The “11/11” counter shows how many are already placed.
- On the pitch you can move every player freely until the formation fits.
- With the red X you take a player off again. Everyone else is automatically on the bench.
- Below the list you set the pitch colour and kit colour.
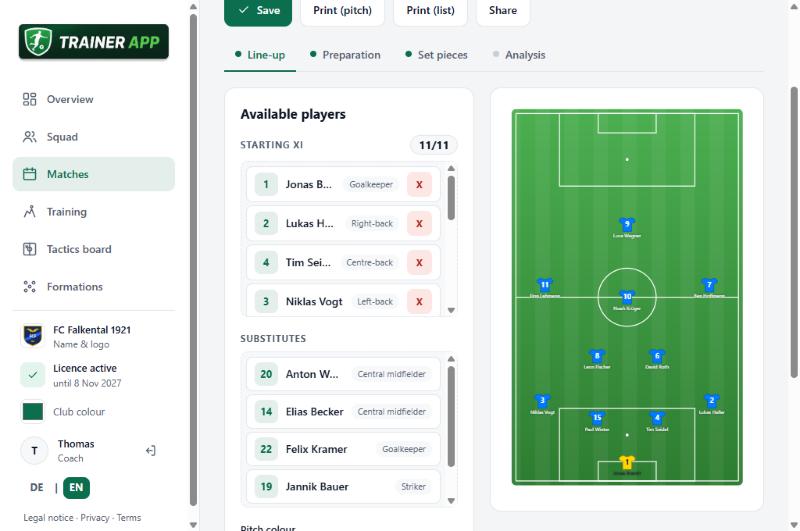
Don’t forget to click Save when you’re done. With “Print (pitch)” you get the line-up as a pitch graphic for the dressing room, with “Print (list)” as a list with starting XI and bench. “Share” sends the line-up to your assistant coaches, for example via WhatsApp or email.
↑ back to top6Match preparation
Here you plan the match the way professional coaching teams do – just without the thick folder. At the very top are the 3 key messages for the dressing room. Nobody in the dressing room remembers more than three points. Keep them short and clear, for example “Press boldly, follow up immediately”.
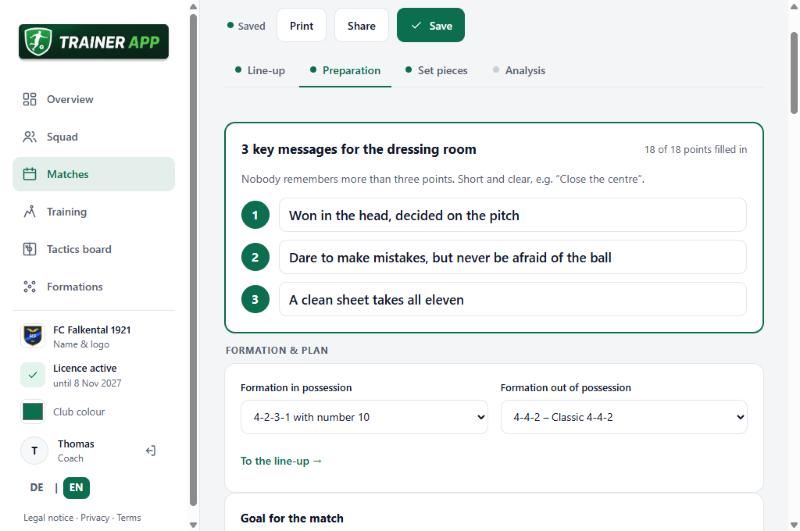
Below that, you work your way from top to bottom. You don’t have to fill in everything – use what helps you:
| Section | What you enter there |
|---|---|
| Formation & plan | Formation in possession, formation out of possession and the goal for the match |
| Opponent | Formation, style of play, current form, strengths, weaknesses, set pieces and key players (via “+ Player”, including who marks them) |
| In possession | How you build up and what happens after winning the ball |
| Pressing | Pressing height and triggers, e.g. “back pass to the goalkeeper” |
| Out of possession | Behaviour after losing the ball and when defending |
| Set pieces | Your own routines, behaviour at opposition set pieces and the takers (corners left and right, free kick, penalty, captain) |
| Game management | Plan when behind and when ahead, plus planned substitutions with minute (via “+ Substitution”) |
| Organisation | Meeting point, departure, warm-up, kick-off, venue, pitch, kit and players carrying knocks |
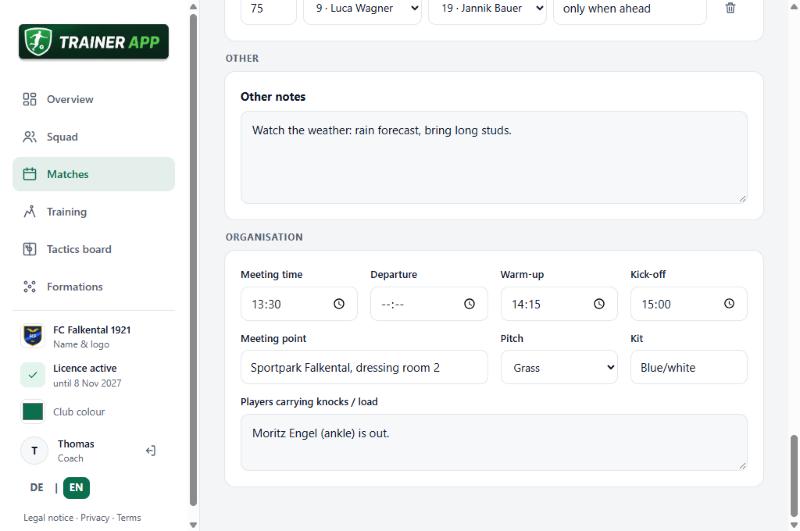
The app uses the planned substitutions again later: after the match it can suggest each player’s minutes from them (see chapter 14).
With “Print” this becomes a neat match plan sheet for you and your coaching team. “Share” sends a short version.
↑ back to top7Set pieces
Corners and free kicks decide many matches. In the Set pieces tab you draw your routines. To start, simply choose a situation, for example “Corner (attacking) – right”.
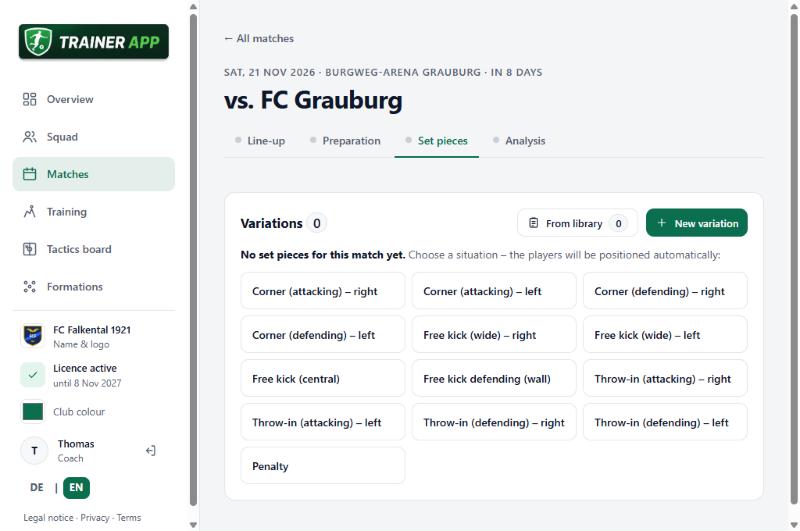
The app immediately places your players, the opponents and the ball in a typical set-up. Then you adjust everything:
- Players – tap one in the list on the left and they appear on the pitch.
- On the pitch, drag to move a player.
- Double-click on a player to remove them from the pitch again.
- Using Templates you can reload the default set-up at any time.
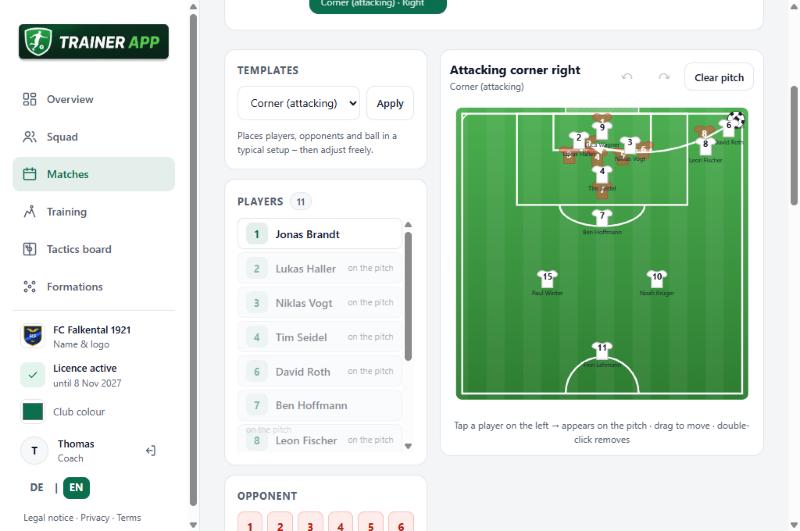
Every routine is collected in the list at the top. With “New variation” you add more. A corner that works well can be saved with “To library”. For the next match, simply use “From library” to fetch it again, so you don’t start from scratch every time.
↑ back to top8Match analysis
After the match is before training. In the Analysis tab you record what happened – ideally the same evening, while everything is still fresh.
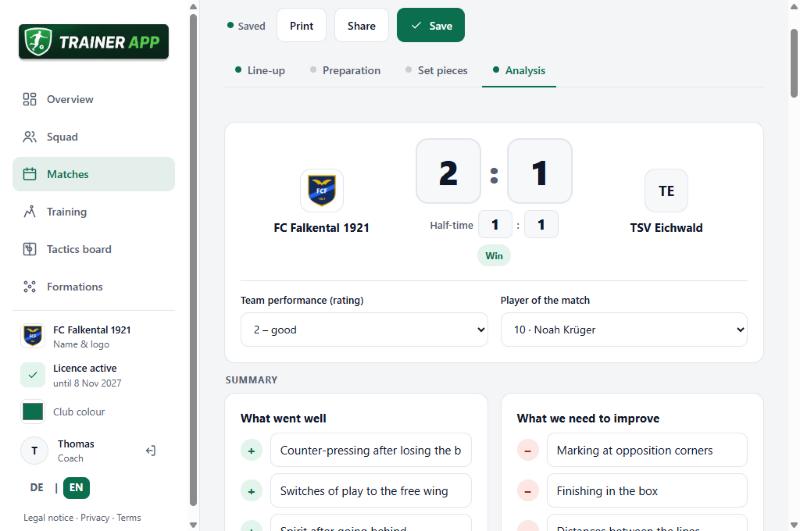
You can enter:
- Result and half-time score. The app works out by itself whether it was a win, draw or defeat.
- Goals scored and conceded with minute, scorer, assist and type (e.g. counter-attack, corner).
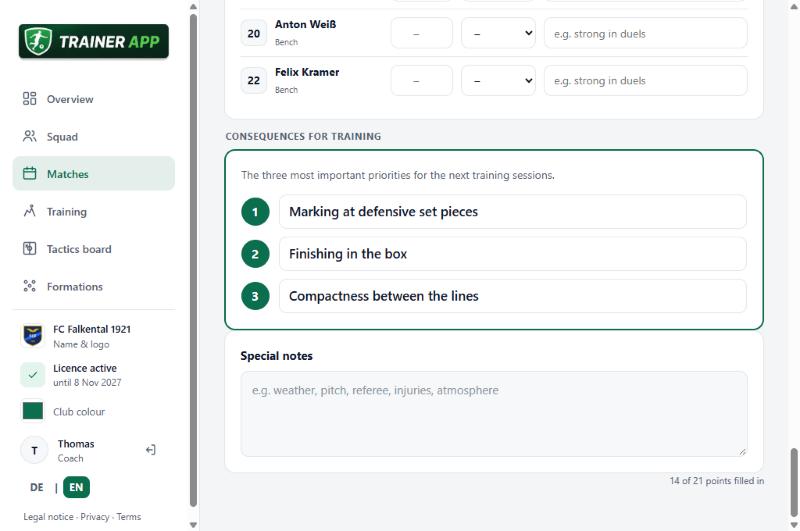
- Summary: three things that went well and three that need to improve.
- Statistics such as possession, shots, corners, fouls and cards.
- Rating of the phases of play (build-up, pressing, transition, set pieces …) with a short comment.
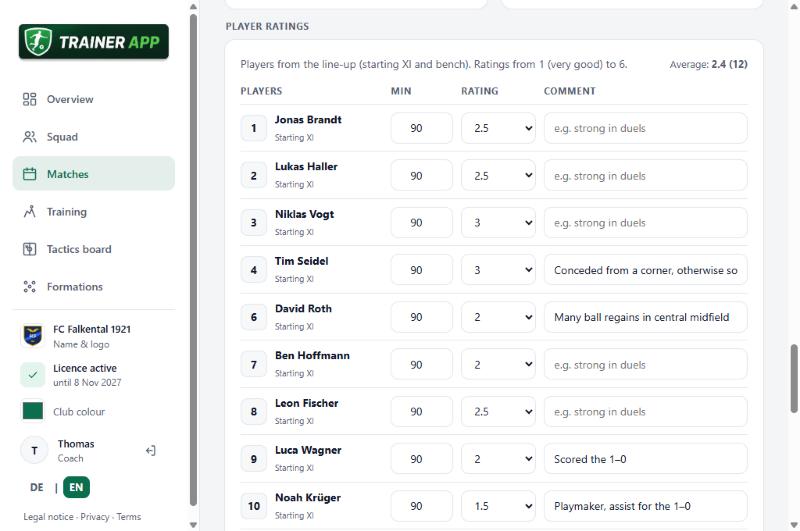
- Player ratings with minutes, a rating from 1 to 6 and a comment.
Consequences for training
At the very bottom you note the three most important training priorities. This is the real benefit of the analysis: these points automatically reappear later in training planning. So nothing you noticed at the weekend gets lost.
9Formations
Under Formations you’ll find over 30 formations with a back four, back three and back five. Each formation comes with a small graphic, a description, strengths, weaknesses and the tasks of each position.
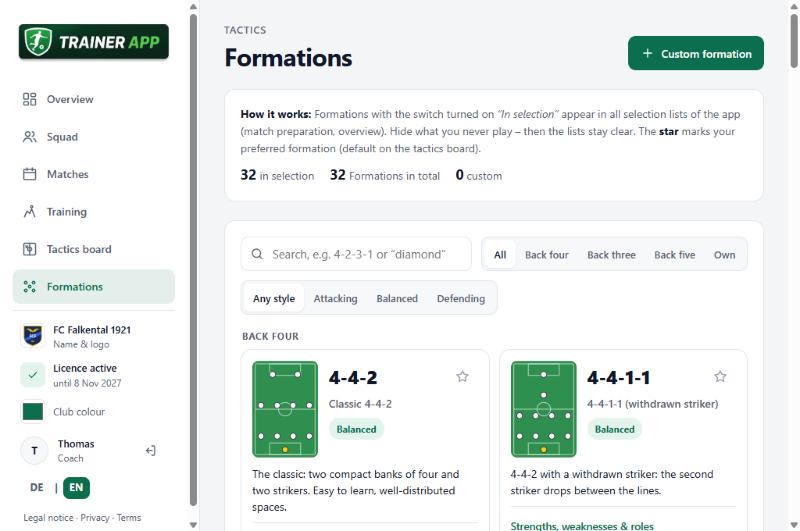
- With the “In selection” switch you decide which formations appear in the app’s selection lists. Hide what you never play to keep the lists tidy.
- The star marks your favourite formation. It is then preselected on the tactics board.
- Using + Custom formation you create your own formation.
10Tactics board
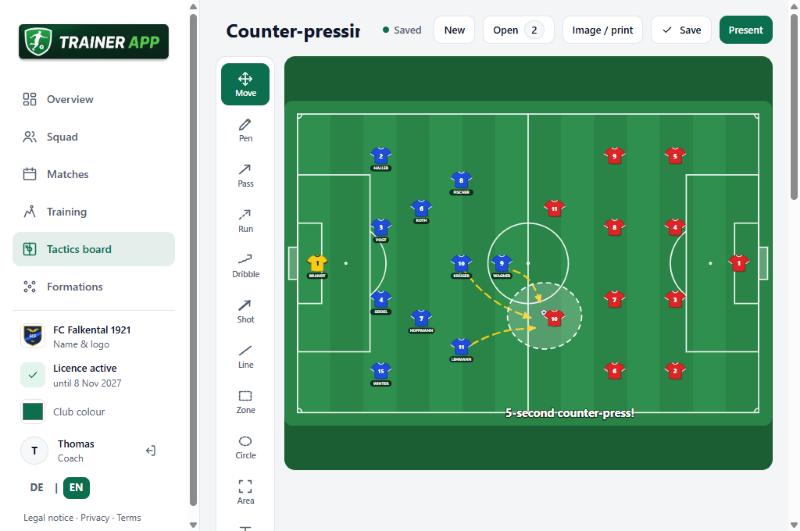
The tactics board replaces the magnetic board in the dressing room. You can use it to explain moves, show something at half-time or animate sequences step by step.
How to build a scene
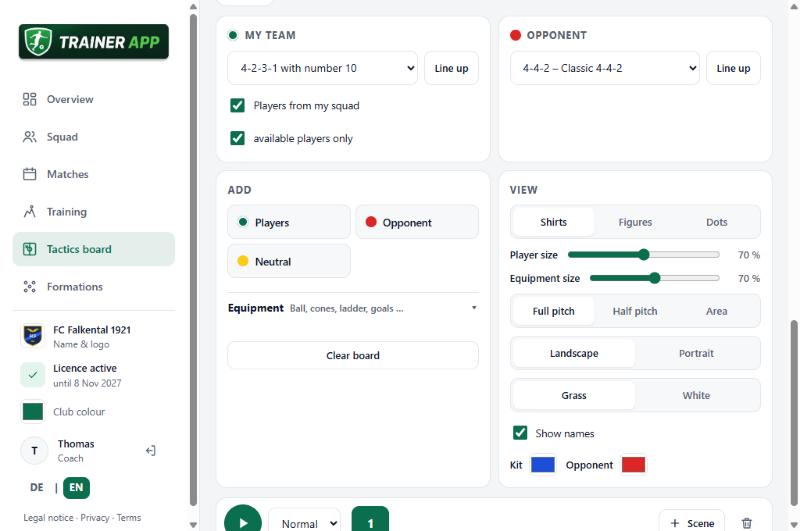
- On the right under My team choose a formation and click “Line up”. With “Players from my squad”, the real names appear on the pitch straight away.
- Under Opponent you do the same for the other team.
- Using Add you add individual players, opponents or neutral players.
- Under Equipment you’ll find the ball, cones and training equipment for your exercises: marker disc, pole, flag, hoop, agility ladder, hurdle, mini goal, full-size goal, rebounder and dummy. Double-tap the ladder, hurdle, goals and rebounder to rotate them in 45-degree steps. When you save an exercise’s graphic, the equipment used is automatically added to the exercise’s equipment list.
The tools
| Tool | What for |
|---|---|
| Move | Drag players, ball, equipment and texts. Double-tapping a player changes number, name, colour and direction; on a ladder, hurdle or goal it rotates the item; on a number or letter you change the text. |
| Pen | Freehand drawing |
| Pass, shot | Drag from start to finish to create an arrow. |
| Run, dribble | Trace the path with your finger or mouse, dashed or as a wavy line |
| Line, zone, circle | Mark the offside line, pressing zone or spaces |
| Text | Tap the pitch and write text. Drag text to move it, tap it to change it. |
| Laser | Briefly point something out; the line disappears by itself. |
| Eraser | Tap or swipe over lines, texts or players to delete them |
You choose the colour for lines and texts in the toolbar. “Back” and “Forward” undo and redo steps, “Clear lines” deletes all drawings in the current scene.
Scenes and animation
At the bottom, use “+ Scene” to add more frames, for example: scene 1 losing the ball, scene 2 counter-pressing, scene 3 winning the ball. With the play button, the app plays the scenes one after another and moves the players smoothly from one position to the next. You set the speed right next to it.
View, present and save
- In View you choose full pitch, half pitch or a section, landscape or portrait, grass or white background, with or without names.
- Under Display you decide what the players look like: Shirts with number and name (tactics board default), Figures (default for exercises) or simple Dots. With the sliders Player size and Equipment size you make players, or the ball, cones and equipment, larger or smaller (40 to 100 %). In an exercise graphic you can place several balls on the pitch.
- Double-tapping a player opens “Edit player”: there you change number and name, give them their own Kit colour (handy for exercises with three or four teams), and for figures set the Direction – in 8 directions: front, front diagonal, side, back diagonal and from behind (each left or right). The small figures in the buttons show you right away what the player looks like. You also choose the Pose (standing, running, pass/shot) and mark the goalkeeper. With “Apply to all players of this colour” you set up a whole group at once.
- In the Equipment menu you’ll find, besides the ball, cones, poles, hurdles, ladder, goals and dummies, Number (black circle 1, 2, 3 …) and Letter (red circle A, B, C …). Use them to label sequences and stations as in a professional exercise graphic. The numbering continues automatically; double-tap to change the text.
- “Present” shows the pitch large on a dark background – ideal on a tablet or TV in the dressing room.
- Save stores the board under its title. With “Open” you get it back.
- “Image / print” saves the board as an image or prints it.
11Exercise library
Under Training there are three tabs: Exercises, Planning and Attendance & load. We’ll start with the exercises.
The starter pack contains 25 ready-made exercises, from warm-up through pressing and transition to the final game, each with a graphic, sequence and coaching points. With the search, the categories and the filters for number of players, duration and intensity, you’ll quickly find the right one.
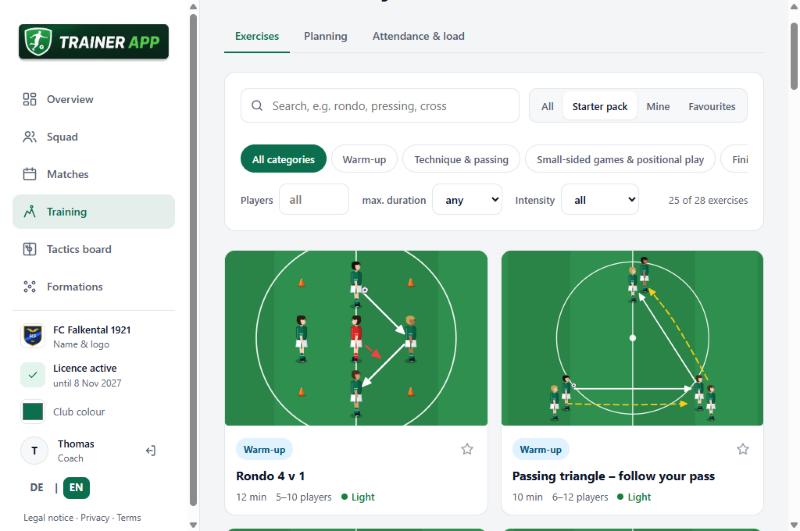
Clicking an exercise shows all the details: goal, sequence, coaching points, easier and harder variation, pitch size, equipment and intensity.
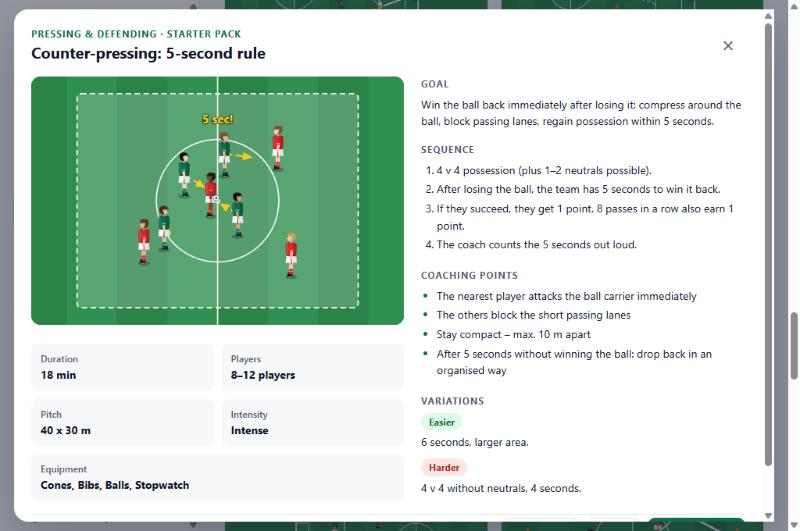
- With the star you mark favourites.
- “Print” gives you the exercise as a card for the pitch.
- “Copy & adjust” turns a starter pack exercise into your own, which you can change freely.
- Using + Own exercise you create brand-new exercises. Simply tap the equipment, for example cones, ladder or mini goals. Enter anything unusual under “Other items”.
- Do you already have a finished graphic or photo of your exercise? Upload it with “Upload image” right in the exercise window. On a phone you can also take a photo straight away. Alternatively, draw the exercise with “Edit graphic” on the tactics board. If an exercise has both, you switch between graphic and image in the view. You have 50 MB of storage for images, enough for around 150 photos. You can see how much is used right below “Upload image”.
12Training planning
In the Planning tab you see your training week from Monday to Sunday. Use the arrows to move between weeks; “Today” jumps back to the current week.
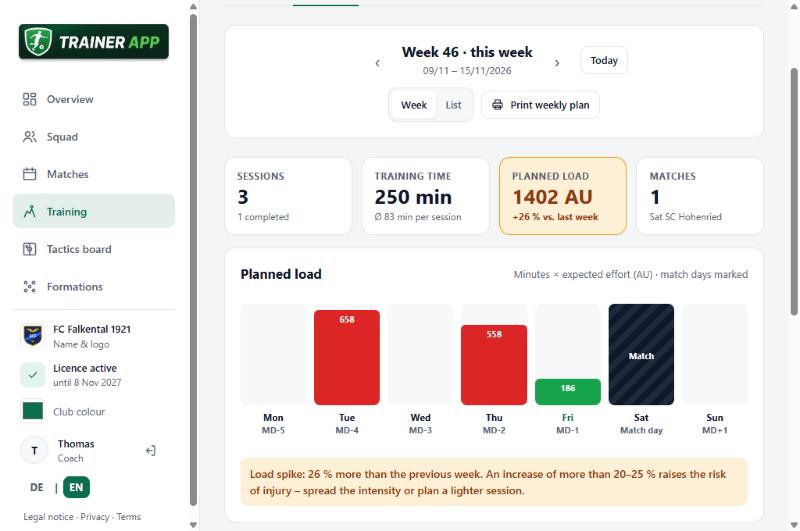
At the top are the week’s key figures: number of sessions, training time, planned load and matches. The app calculates the load from minutes times the expected effort of the exercises. If it is more than 25 % above the previous week, you get a warning. Jumps that big are proven to increase the risk of injury.
Above each day is the distance to the match: MD-1 is the day before the match, MD+1 the day after (MD stands for “match day”). This shows you at once on which day you can train hard and when it should be easy.
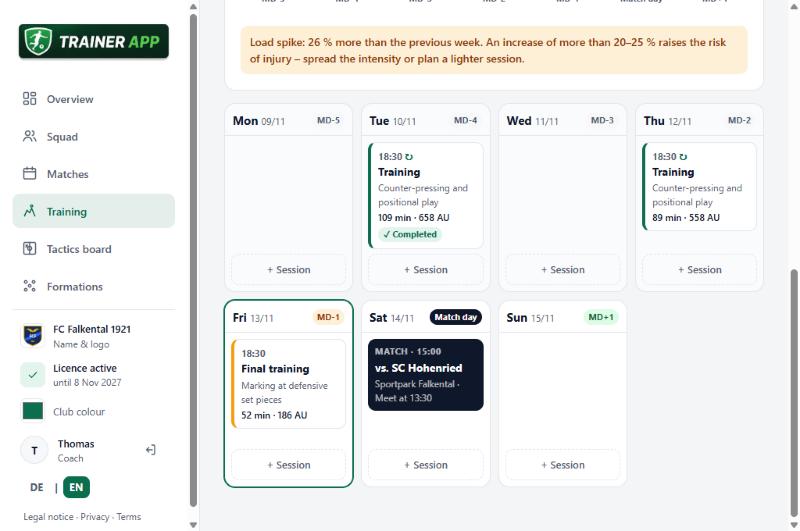
With “+ Session” below a day, you plan a new session for exactly that day. With “List” at the top you see all sessions one below the other; with “Print weekly plan” you get the week on an A4 sheet for the dressing room door.
Series: create regular training days in one go
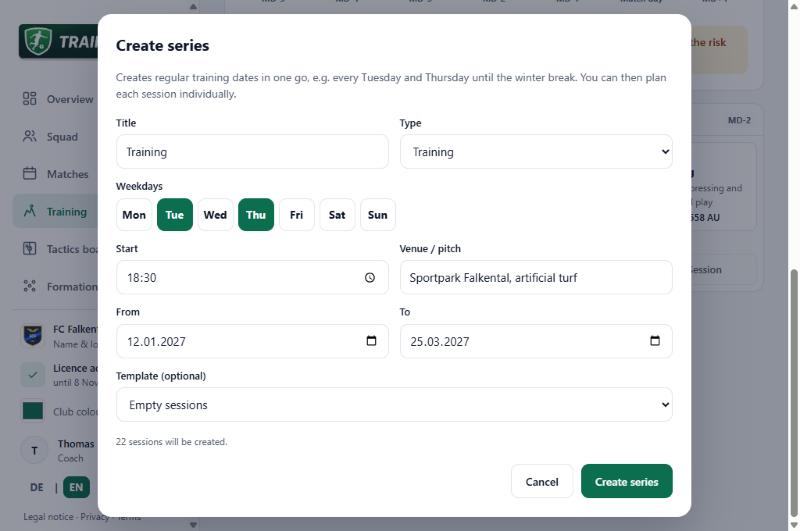
You always train on Tuesdays and Thursdays? Then don’t create every session individually. Click “Create series”, choose the weekdays, the time, the venue and the period, e.g. until the winter break. If you like, every session takes the plan of an existing session as a template.
13Plan a session
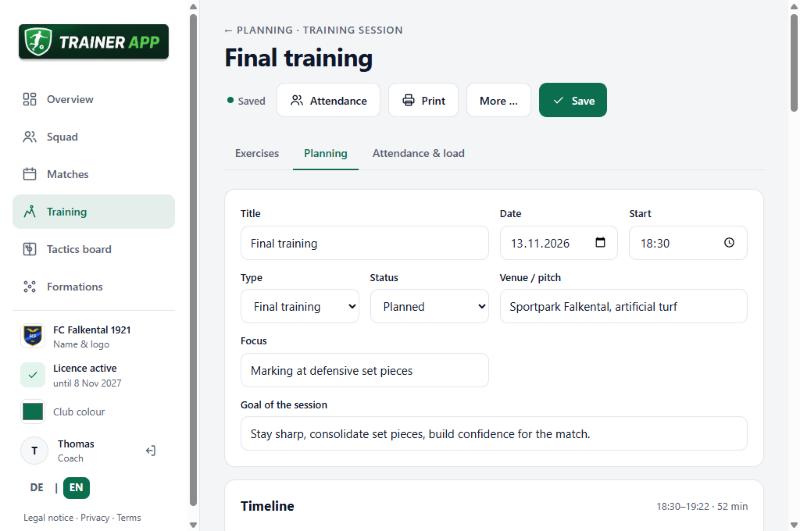
Clicking a session opens the session editor. As an example, we’ll plan the final training on Friday, one day before the match.
Add exercises
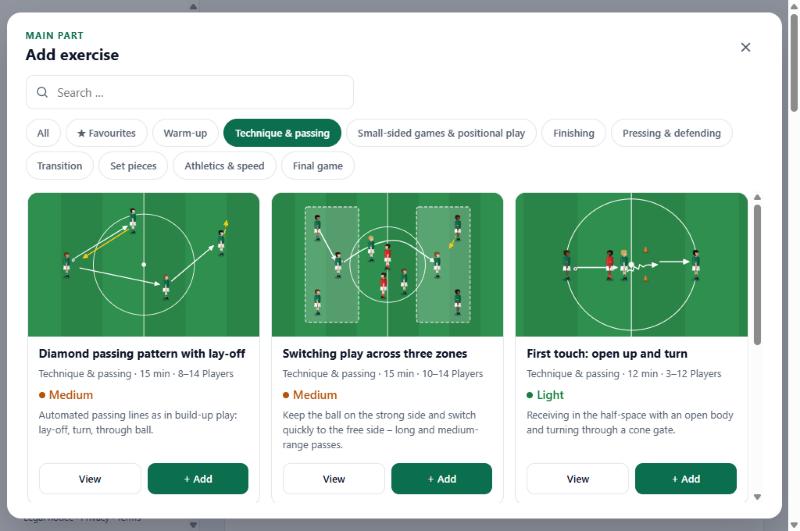
The session is divided into three phases: warm-up, main part and final part. With + Exercise the exercise picker opens. The app preselects the matching category – warm-up exercises for the warm-up. With “View” you take a closer look at an exercise, with + Add it goes into the session.
With “+ Block” you add free items that aren’t exercises, such as a drinks break, team talk or cool-down.
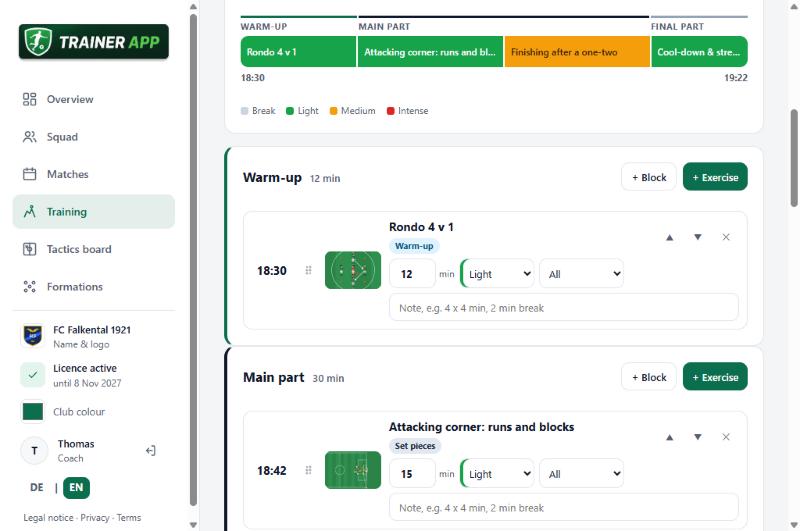
For each exercise you set:
- Duration in minutes
- Intensity: break, light, medium or intense (the app calculates the planned load from this)
- Group: all, group A, B, C or goalkeepers
- parallel: tick this if two groups do different exercises at the same time. The time then only counts once.
- a short Note, e.g. “4 x 4 min, 2 min break”
You change the order with the ▲▼ arrows or, on a PC, simply by dragging the handle on the left. Exercises can also be moved from one phase to another.
The summary: too much or too little?
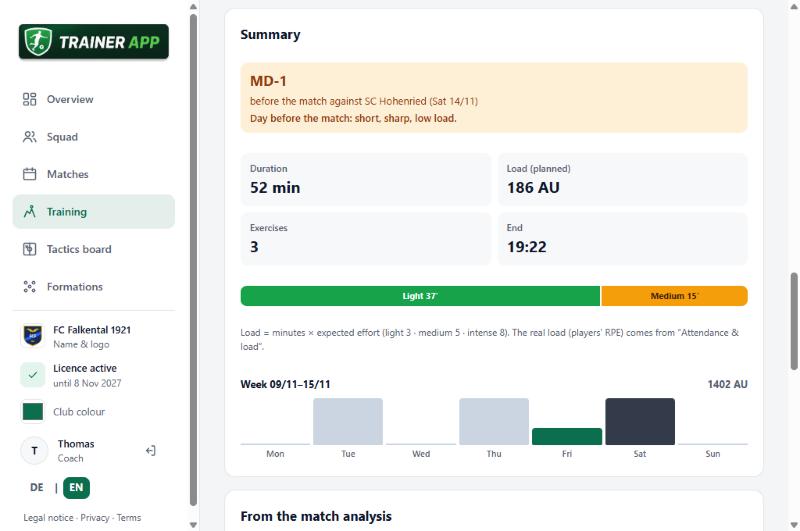
Below the phases, the Summary shows duration, end, planned load and the load for the whole week. The app keeps an eye on things: if you plan too much intensity on the day before the match (MD-1), or too much load on the day after, you’ll get a notice.
From the match analysis
Remember the three training priorities from the analysis? This is where they reappear. Tapping one makes it the focus of the session and directly opens matching exercises.
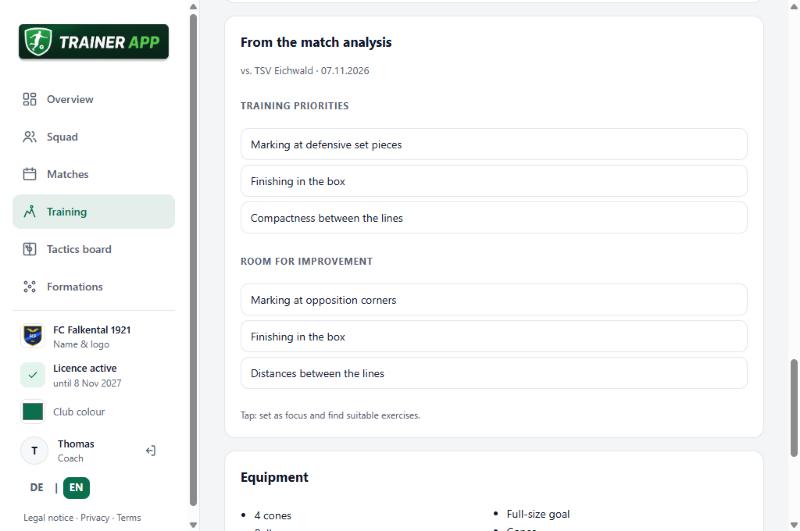
Below that, the app automatically creates an equipment list from all exercises: cones, balls, bibs and so on. You add your own equipment by hand.
Save, print and more
- Saving happens automatically as soon as you change something. At the top it then says “Saved” with the time.
- “Print” comes in two versions: as a compact training plan or with all exercise cards as well.
- Under “More …” you can copy the session to another date, delete it or delete a whole series from this date on.
- The “Attendance” button takes you straight to recording this session.
14Attendance and RPE
Now comes the part many coaches underestimate at first. It takes less than two minutes after training and gives you the most over the season: you know who attended how often and how much load each player is carrying.
What is RPE?
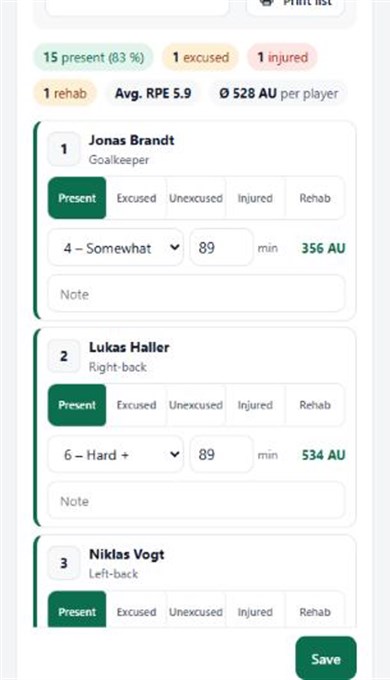
RPE stands for “Rating of Perceived Exertion”, in other words: how hard was it for you? Ask your players about 20 to 30 minutes after training for a number from 1 (very, very easy) to 10 (maximal). This is a recognised method that is also used in professional football. The app calculates the load from it: RPE times minutes. So a player with RPE 6 after 89 minutes of training has 534 load points (AU).
Record a training session
Under Training, go to the Attendance & load tab and then to “Record”. On the left are your sessions and matches. Dates not yet recorded show “open” as their status.
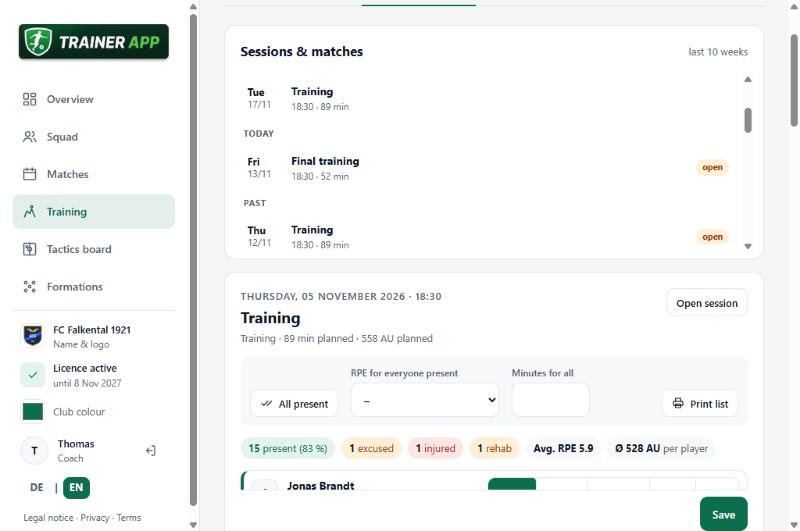
Here’s the quickest way:
- Click “All present”.
- Only change the exceptions: Excused, Unexcused, Injured or Rehab. Tapping again clears the selection.
- Under “RPE for everyone present” choose the value most players gave.
- Then only adjust the players who said something different.
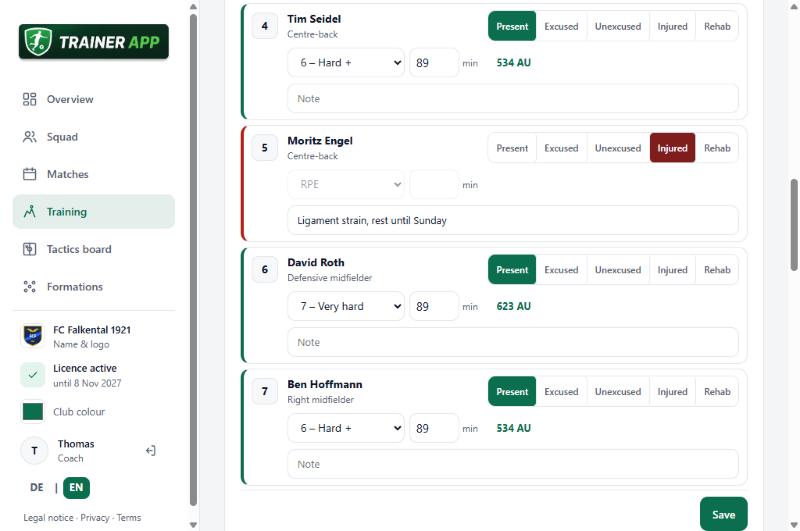
Saving is automatic. The session is then marked as “completed”. With “Print list” you get an attendance sheet with boxes and an RPE scale, in case you prefer to take notes on paper and enter them later.
Make it a routine: after the cool-down, quickly ask for the number, or have the players call it out to you on their way off. After two or three weeks it runs by itself.
Record matches
Matches are part of the load too – often they’re even the biggest chunk of the week. Select the match on the left. Instead of Present etc., the options here are Played, Bench, Not in squad and Injured.
The “Take from line-up” saves you most of the work: the starting XI gets 90 minutes, the bench is marked as bench, and planned substitutions from the match preparation are already taken into account. Afterwards you only correct what went differently in the match and enter the RPE.
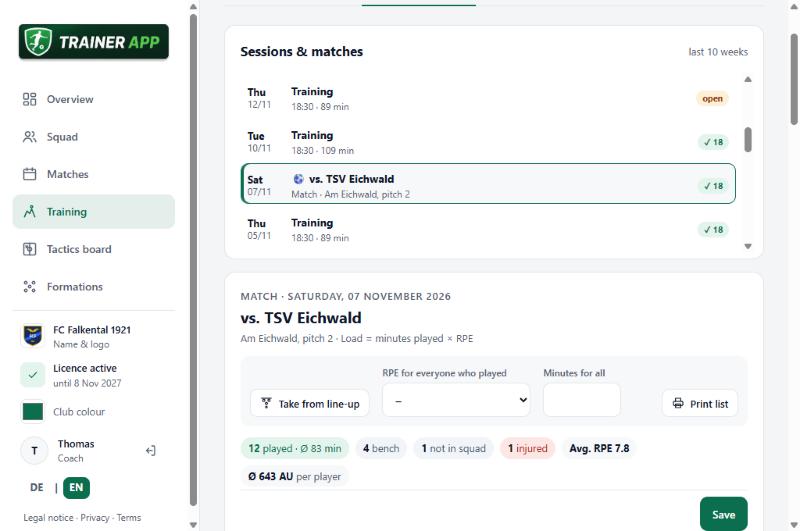
15Analyse the load
In the “Report” section you see what all the numbers turn into.
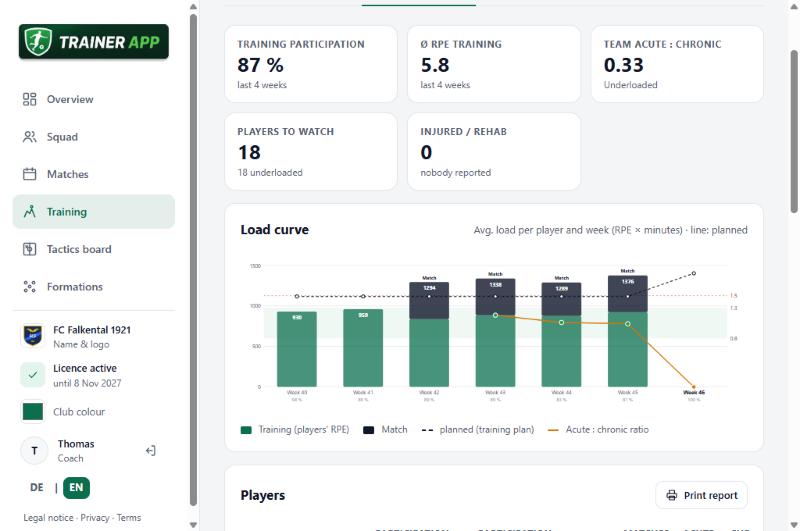
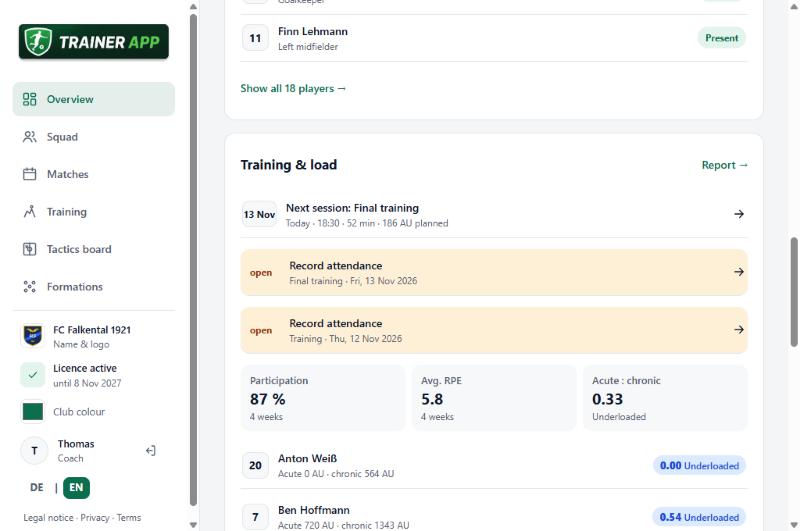
- Training participation: what percentage of players attended training in the last four weeks.
- Ø RPE training: how hard the sessions were on average.
- Acute : chronic: the most important warning sign (see below).
- Players to watch and who is currently injured or in Rehab at the moment.
In the Load curve the bars show the actual load per player and week, split into training and match. The dashed line is what you had planned. This shows you whether your planning and what the players feel match up.
Acute : chronic explained simply
The app compares the load of the last 7 days (acute) with the weekly average of the last 4 weeks (chronic). If the load suddenly rises sharply, the body isn’t prepared for it and the risk of injury increases.
| Value | Traffic light | Meaning |
|---|---|---|
| below 0.8 | Underloaded | Too little stimulus. OK for a recovery week, but not permanently. |
| 0.8 to 1.3 | Optimal | The safe zone |
| 1.3 to 1.5 | Elevated | Be careful, make the next session rather lighter |
| above 1.5 | High risk | Reduce the load, talk to the player |
An example from our FC Falkental: Paul Winter sat on the bench for a long time. Then Moritz Engel got injured, Paul moved into central defence and suddenly played 60 and 90 minutes in the last two matches. That’s why his traffic light shows “High risk”. This is exactly the kind of thing the app should show you before he gets injured.
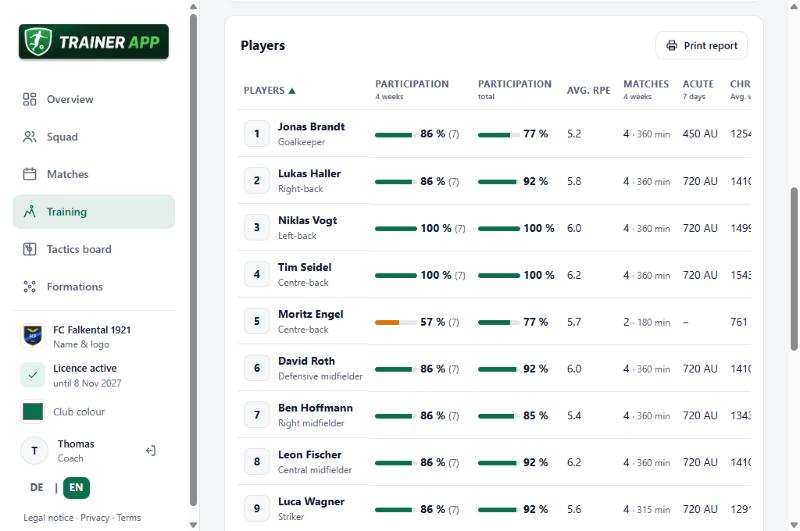
The traffic light only appears once there are at least three weeks of data for a player. Until then it says “not enough data”. Injured and rehab players are shown as “Unavailable” and are not counted as underloaded. The traffic light never replaces talking to the player – it’s a pointer, not a verdict.
With “Print report” you get everything on one A4 page, for example for a meeting with the coaching team or the fitness coach.
↑ back to top16The overview in everyday use
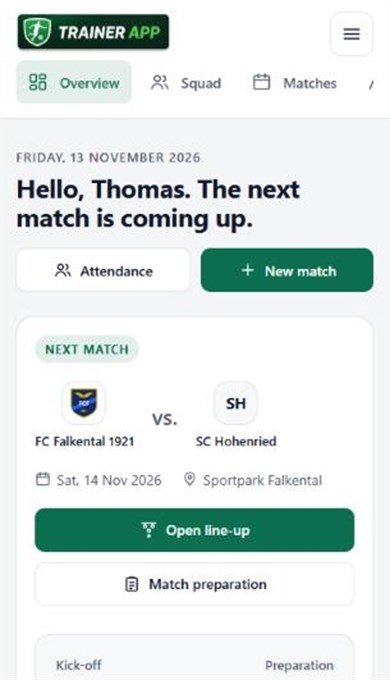
Once everything is set up, the Overview becomes your home page. It shows the next match with the badges, how long until kick-off and how far the preparation has come. Every step can be clicked directly.
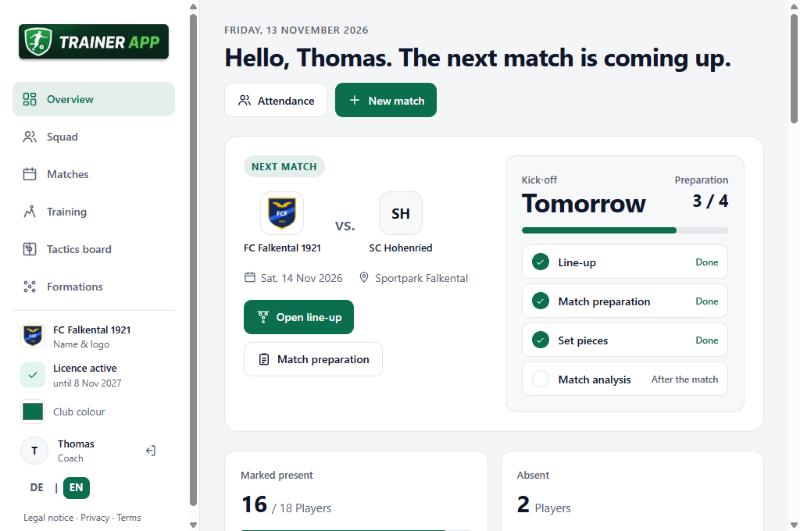
Further down are the squad, the next matches, the latest analysis and the card “Training & load”. There you see the next session, reminders about training sessions or matches not yet recorded, and the players whose load currently stands out.
At the very bottom you can also set your preferred formation – it will be preselected on the tactics board.
↑ back to top17On your phone and on the pitch
The app adapts to every screen. On a phone the navigation moves to the top, and all buttons are big enough for your finger – even with cold hands on the touchline.
- iPhone (Safari): Tap the share icon, then “Add to Home Screen”.
- Android (Chrome): Open the three-dot menu, then “Add to Home screen”.
After that you start the Trainer App with one tap, just like any other app.
18Frequently asked questions
Do I have to install anything?
No. The Trainer App runs in the browser on PC, tablet and phone. All you need is internet. If you like, you can put it on your home screen as an icon (see chapter 17).
Who can see my data?
Only you. Each coach only sees their own squad, matches, exercises and training data.
I’ve forgotten my password.
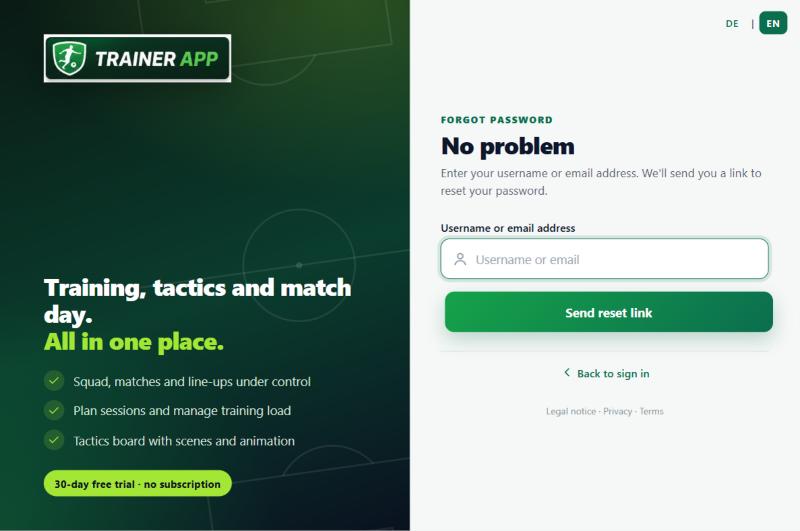
On the sign-in page, click “Forgot password?”, enter your username or email address and follow the link in the email.
Why don’t I see all players in the line-up?
Only players marked as present in the squad appear in the line-up. Switch the missing players to “Present” in the squad.
What happens if I delete a player?
The player disappears from the squad, and their attendance, RPE and minutes-played entries are deleted too. This cannot be undone. If a player is just out for a longer time, mark them as absent instead.
Do I really have to record every training session?
For training participation, attendance is enough. For the load traffic light you also need the RPE. The more regularly you record, the more accurate the values. You can add a forgotten session at any time.
Why does a player show “not enough data”?
For the acute-to-chronic ratio, the app needs at least three weeks of data for this player. After that, the traffic light appears automatically.
Can I print the guide?
Yes, with your browser’s print function (Ctrl + P on a PC). The pictures are printed too.
Have fun with the Trainer App and every success with your team! If anything is missing or unclear, feel free to write to us – we appreciate all feedback.
↑ back to top